Managing DNS for Premium Business Email
IMPORTANT! Because cloud sites are basically shared server sites, many Control Panel functions are NOT directly available/accessible to individual domain authorized users. Please contact CSN Support at CyberCenter@CyberSite.net to request help in making any DNS changes for your site's Premium Business Email account.
Following is the process CSN uses to manage DNS for Premium Business Email accounts.
If you're transitioning from a different email provider to Premium Business Email, you won't receive any email to your Premium Business Email inbox until you edit your DNS records. There are a few steps and options to configure the DNS for Premium Business Email. Use the links below to navigate to the section you need to find instructions for:
• Edit Your MX Records
• Set Up a Sender Policy Framework (SPF) Record
• Enable DKIM
• Enable Autodiscover for Hosted Exchange
EDITING YOUR MX RECORDS
DNS MX records tell your mail where to go, and when you switch your email provider, you have to update the directions (just like when you move in real life). Specifically, you need to change your MX records wherever your DNS is hosted. If you aren't sure where your DNS is hosted, you can use whois as described in Where Is My DNS Hosted? Once you know where your DNS is hosted, change your current MX records to the Premium Business Email mail servers (make sure to add both these records):
| Hostname | TTL | Record Type | Priority | Destination |
| Blank or @ | 3600 | MX | 10 | http://mx1.emailsrvr.com |
| Blank or @ | 3600 | MX | 20 | http://mx2.emailsrvr.com |
If your DNS is hosted at Liquid Web, you can follow "Adding and Editing DNS Records". Once you change your MX records, the changes will take a little while to propagate (24-48 hours). We recommend you make these changes during slow traffic times, like at night or a weekend. Don't worry: you won't lose any mail while your DNS records are propagating.
SETTING UP A SENDER POLICY FRAMEWORK (SPF)
SPF records tell the recipients server that mail coming from your environment is legitimate and helps keep your email from being sent to the recipients spam email box. All SPF records are stored in your DNS information as TXT records. If you aren't familiar with DNS records, read What Are DNS Records? first.
SPF RECORD SYNTAX
Premium Business Email SPF records look like this:
v=spf1 mx include:http://emailsrvr.com -all
They look a little bit intimidating, but they can be easily broken down into different parts.
- v=spf1 designates this record as an SPF record.
- mx allows mail to be sent from the domain that matches the email address's MX records.
- include: tells the MX record to include either the hostname of the mail server or a specific IP following the colon ( : ).
- http://emailsrvr.com is the domain the SPF record applies to. Every Premium Business Email domain will point to emailsrvr.com.
- ~all determines how mail is handled if it doesn't match the other rules. The tilde (~) allows mail whether or not it matches the parameters in the record.
This default SPF record is simple but effective. You can use this record directly by replacing "http://domain.com" with your domain (remember to keep the ending period). There are, however a few other options.
- Adding ip4:ipaddress specifies an IPv4 that is allowed to send mail. To use this, replace "ipaddress" with your server's IP address.
- Adding ip6:ipaddress specifies an IPv6 that is allowed to send mail. To use this, replace "ipaddress" with your server's IP address.
- If you want mail that doesn't pass your rules to be strongly rejected, use -all instead of ~all.
ENABLING DKIM
DomainKeys Identified Mail (DKIM) is a way to attach an encrypted digital signature to your email. Like adding an SPF record to your server, DKIM helps prevent email spoofing. Email spoofing is when spammers send email that looks like it's coming from your email address. Spammers spoof your address to make it more likely that recipients will open spam emails, less likely that messages will be marked as spam, and harder to find the true spam source. If your address is spoofed, your server could get flagged as a spam server and you can have trouble sending legitimate mail, even if you aren't doing anything wrong. This is commonly known as having a bad mail reputation.
Outgoing DKIM works by generating an encrypted digital signature that is attached to email messages sent by your server. This signature is generated using a public key you save as a DNS record. Theoretically, only you have access to your DNS records, so mail signed using this key should be unmodified and verified as coming from your server.
- Log into your Premium Business Email control panel.
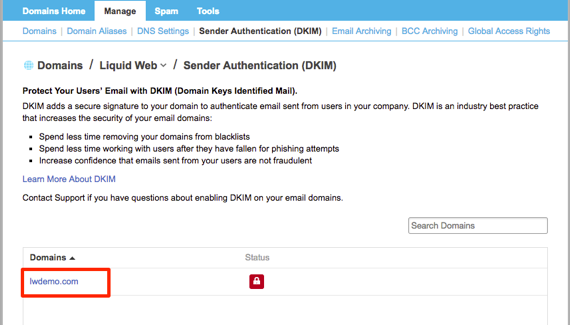
- In the Domains section, click on Sender Authentication (DKIM).
- Click on the domain where you're enabling DKIM.
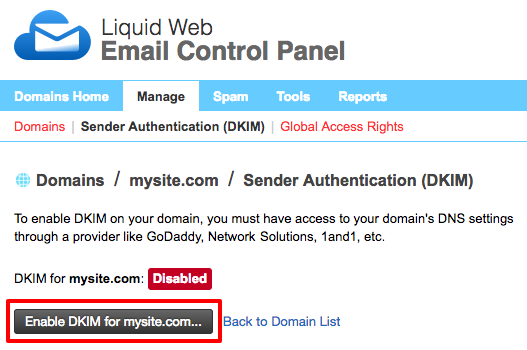
- Click Enable DKIM for http://mysite.com.
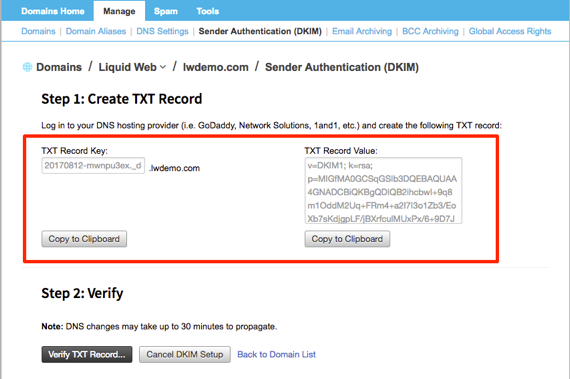
- Premium Business Email will generate the TXT record you need for DKIM. For DKIM to work, you must add this record to your DNS. If you aren't sure where your DNS is hosted, check out Where Is My DNS Hosted? Then, follow the instructions in Adding and Editing DNS Records to add your TXT record.
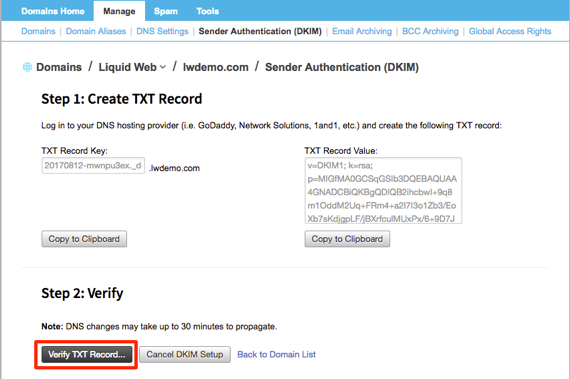
- After you've added your record, within the control panel, click Verify TXT Record... It takes a while for your DNS changes to reach the whole internet. We recommend waiting at least 30 minutes before attempting to verify your DKIM record.
- Once you see a success message for your DNS verification, your domain will automatically start using DKIM verification when it sends email!


ENABLING AUTODISCOVER FOR HOSTED EXCHANGE
Autodiscover is a service that allows you to configure your email clients when Outlook is downloaded to your computer. You can configure the email clients by knowing only your email address and password, and Autodiscover will automatically find the exchange server for the specific email account. In addition to configuring your email client, Autodiscover also enables additional features in Hosted Exchange like downloading the offline address book, viewing free/busy time in a calendar and the out-of-office assistant.
To set up Autodiscover, you will need to first update your MX Records. See the instructions for the MX records at the beginning of this article. Once you have the MX Records updated, you will need to add a CName for Autodiscover.
NOTE: Autodiscover is not compatible for Outlook 2011 or Mac mail.
To enable Autodiscover for Hosted Exchange, enter the following CName record in your DNS entries for your domain. If you aren't sure where your DNS is hosted, see our article Where Is My DNS Hosted?
| Type | Hostname | Destination | TTL |
| CNAME | autodiscover | http://autodiscover.emailsrvr.com | 3600 |
Once you change your MX and CName records, the changes will take a little while to propagate (24-48 hours). We recommend you make these changes during slow traffic times, like at night or a weekend. Don't worry: you won't lose any mail while your records are propagating.
Now you have all the information needed to set up your Premium Business Email DNS.
Cloud Sites, Email, Premium Business Email, Managing DNS, DNS Records

CSN Support
It's all about what we can do for you.
You have passion, enthusiasm, goals, and need the best. We have the ideas, strategies, and solutions perfect for you.Have a project that you'd like to discuss? Click the button below to tell us a bit about it.
Let's create something great together.
START A PROJECT
