
Adding and Editing DNS
IMPORTANT! Because cloud sites are basically shared server sites, many Control Panel functions are NOT directly available/accessible to individual domain authorized users. Please contact CSN Support at CyberCenter@CyberSite.net to request help in making any additions, changes, and/or deletions to your DNS records.
Following is the process CSN uses to make DNS record changes.
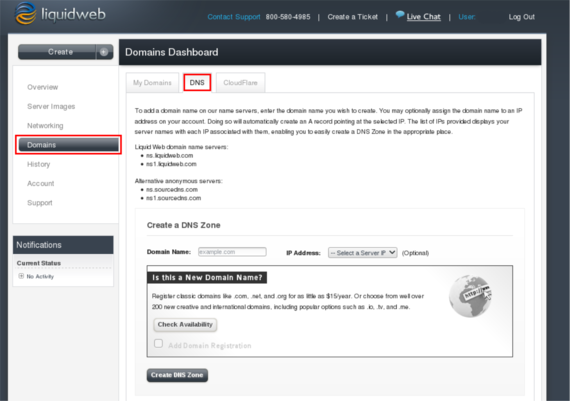
Log into your Liquid Web account, select Domains from the left menu, and click on the DNS tab. Scroll down to the Create a New DNS Zone section.
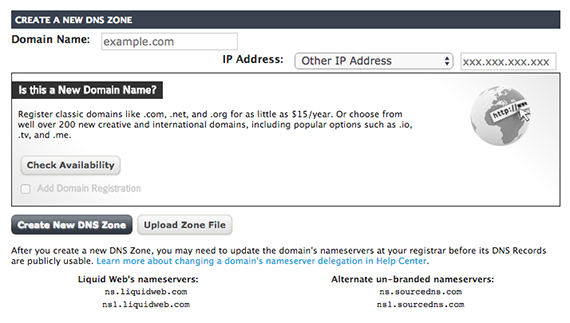
CREATE A NEW DNS ZONE
1. Input the domain name of your choosing.
2. Select the 'IP Address' drop-down list:
Other IP Address - User defined IP address to use for the relevant domain
Import From a Live Domain - Based on the domain selected, our
system will copy current the A record IP address
3. Click the 'Create New DNS Zone' button.
UPLOADING A ZONE FILE
This option should be used when trying to import an existing DNS zone file from an external source or from a backup.
1. Input the domain name of your choosing.
2. Click on the 'Upload Zone File' button.
3. Select the DNS zone file from your local file system.<
NOTE: This functionality will not override an existing domain's record in the system.
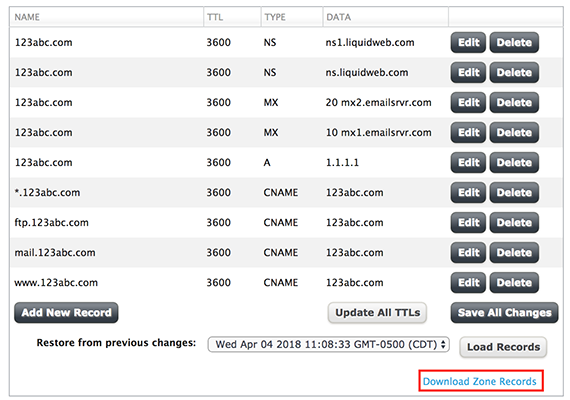
EXPORTING A DNS ZONE
- Scroll to the Current DNS Zones section and click the [+] Plus Sign to the left of the domain name to expand the zone details
- Click on 'Download Zone Records' at the bottom-right corner of the section:
- You will be presented with a download prompt to complete the export. The export file generated will be BIND in format. Example of Export File:
| Domain: http://domain.com Exported (y-m-d hh:mm:ss): 2018-04-06 12:00:00 |
||||||
| This file is intended to be informational and for user reference only. | ||||||
| Before migrating or using this file on a production environment please validate record accuracy. Please ensure you update the SOA record with the correct authoritative name server, contact e-mail address information, and the correct NS records for the name servers which will be authoritative for the new Domain. Use of this zone data with any other third-party DNS software and services is not supported. |
||||||
| ; | SOA Record | TTL | ||||
| http://domain.com. | 3600 | IN | SOA | http://ns.liquidweb.com | ||
| http://liquidweb.com. | ( | |||||
| 2018031300 | ||||||
| 86400 | ||||||
| 7200 | ||||||
| 3600000 | ||||||
| 14400 | ||||||
| ) | ||||||
| ; | A Records | |||||
| @ | 3600 | IN | A | 1.1.1.1 | http://domain.com | |
| ; | CNAME Records | |||||
| ftp | 3600 | IN | CNAME | @ | ||
| 3600 | IN | CNAME | @ | |||
| www | 3600 | IN | CNAME | @ | ||
| * | 3600 | IN | CNAME | @ | ||
| ; | MX Records | |||||
| @ | 3600 | IN | MX | 10 | ||
| ; | NS Records | |||||
| @ | 3600 | IN | NS | http://ns1.liquidweb.com | ||
| @ | 3600 | IN | NS | http://ns.liquidweb.com | ||
MODIFYING YOUR DNS
The most common reason to change DNS Records for a domain is to make sure the domain points to the right IP address so the website resolves correctly. As long as the domain is using a Liquid Web nameserver, it's simple to change DNS records by logging into your Liquid Web account.
Is the Domain Using Liquid Web's Nameservers?
Liquid Web uses four nameservers:
• http://ns.liquidweb.com
• http://ns1.liquidweb.com
• http://ns.sourcedns.com
• http://ns1.sourcedns.com
As long as a domain is using one of these nameservers, DNS records can be easily edited in your Liquid Web account. If you use private nameservers, your DNS records can be changed in WHM or Plesk. If the domain is using different nameservers, read Where Is My DNS Hosted? to learn more about your options. You will need to change your DNS records wherever your DNS is hosted.
There are a few different ways to find out if a domain is using Liquid Web's nameservers.
- Use a web-based WHOIS lookup tool such as ICANN WHOIS and looking at the Name Server listing.
- Query WHOIS from a terminal by running the command: — whois http://yourdomainname.com — and looking at the Name Servers listing.
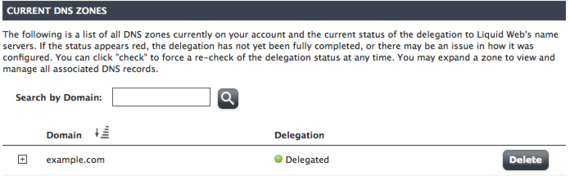
- Log into your Liquid Web account, select Domains from the left menu, and click on the DNS tab. Scroll down to the Current DNS Zones section and look at the Delegation column. If you see a green dot labeled “Delegated”, your domain is using Liquid Web nameservers and you can click the [+] Plus Sign the the left of the domain name to start managing your DNS records immediately.
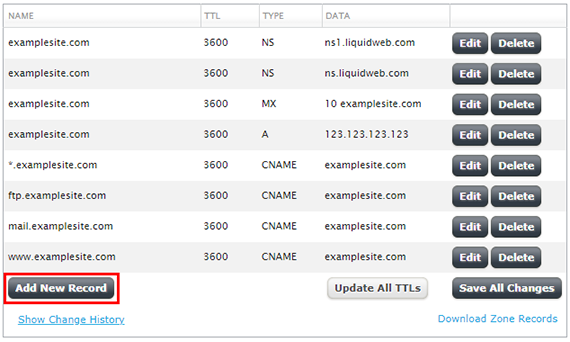
ADD OR EDIT A DNS RECORD USING MANAGE
- From your Liquid Web account, click on Domains in the left menu and then select the DNS tab in the Domains Dashboard.
- Click the [+] Plus Sign to the left of the domain name to expand its DNS record.
- To add a new record, click the Add New Record button at the bottom. To edit an existing record, click the Edit button to the right of the entry you wish to change. Make sure to fill out all four fields in the record you are adding or editing. If you're not sure what type of record to add, read about different types of DNS Records. Make sure to use an IP address assigned to your server so your domain doesn't point to someone else's website.
- Click the green checkmark to accept the DNS record. Once the record is added, DNS will begin to propagate. DNS propagation is when the old DNS records are replaced with the new records on local DNS servers and nameservers. This usually only takes a few hours, but could take up to 48 hours. See if DNS changes are fully propogated using an external tool called What's My DNS.

RESTORING DNS RECORDS
- Click the [+] Plus Sign to the left of the domain name to expand its DNS record.
- Under the 'View Change History' section, select the date/time for the DNS zone snapshot.
- Click the 'Compare Records' button.
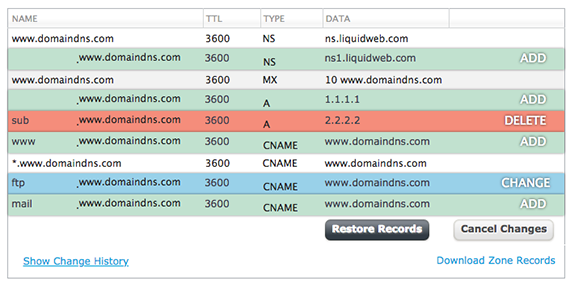
- Based on the time selection a window will load with the changes and their values:
- History Types
Add — The highlighted record will be added to the zone.

Change — The record will be updated to the highlighted value.

Delete — The highlighted record will be removed from the zone.

- When you are comfortable with the changes, click the 'Restore Records' button. NOTE: A snapshot of the current DNS zone being restored will be saved on update.

Cloud Sites, Domain Name Servers (DNS), Managing DNS Records

CSN Support
It's all about what we can do for you.
You have passion, enthusiasm, goals, and need the best. We have the ideas, strategies, and solutions perfect for you.Have a project that you'd like to discuss? Click the button below to tell us a bit about it.
Let's create something great together.
START A PROJECT